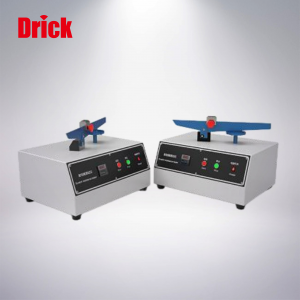
Scratch Resistance Tester DRK-LT-111
Short Description:
DRK-LT-111 Scratch Resistance Tester Purpose: The application fields include rigid organic materials, coating adhesives, powder coatings, anodized materials, soft metals, plastics, and glass, etc. It can also be used to test the quality of adhesives for the same type of materials and protective coatings, as well as the ultimate performance of similar materials. The instrument consists of a balance bar, fixed weights, adjustable weights, a sample – carrying disc, etc. Before the test,...
DRK-LT-111 Scratch Resistance Tester
Purpose:
The application fields include rigid organic materials, coating adhesives, powder coatings, anodized materials, soft metals, plastics, and glass, etc. It can also be used to test the quality of adhesives for the same type of materials and protective coatings, as well as the ultimate performance of similar materials. The instrument consists of a balance bar, fixed weights, adjustable weights, a sample – carrying disc, etc. Before the test, the height of the balance bar needs to be adjusted according to the thickness of the sample so that when the scratch head is installed in the middle of the balance bar and the sample is placed on the sample – carrying disc, the balance bar can remain horizontal. During the test, the fixed weights remain stationary, and the adjustable weights are moved to control the weight pressing on the sample. As the sample – carrying disc rotates counter – clockwise, the scratch head leaves arc – shaped scratches on the surface of the sample.
Compliant Standards:
lAS/NZS AS2924.2
lASTM C217 GB/T15102
lBS EN 438-2 GB/T17657
lBS EN 13310:2003
lBS EN 14323 EN15186
lDIN 68861-4 GB/T18102
lDIN 53799
BS EN 14688:2006
TSF7365 5.2.12-2009
Principles:
Place the specimen in the groove of the thickness control device and adjust the position of the nut. Install the specimen on the rotatable circular platform and fix it with the pressing block and nut. Install the scratch head in the corresponding groove in the middle of the weighing rod. Rotate the balance rod so that the head of the scratch head just touches the specimen. Start the instrument, the disc moves, and the scratch head leaves scratches on the surface of the specimen.
Technical Parameters:
This part consists of a thickness control device, a height – adjusting nut, a front – to – back position – adjusting nut, and a balance rod. The height of the balance rod is determined by the thickness of the specimen. Before the test, insert the specimen into the groove of the thickness control device and adjust the height – adjusting nut so that the specimen fits exactly in the groove. When the specimen is installed on the circular sample – carrying platform and the friction head is installed in the balance rod with its head touching the specimen, at this time, the balance rod is basically parallel and only needs fine – tuning (check the levelness by placing a spirit level).
Test Objects: Rigid organic materials, coating adhesives, powder coatings, anodized materials, soft metals, plastics, and glass, etc.
- Disc Movement Direction: Counter – clockwise or clockwise
- Disc Movement Speed: It can be arbitrarily selected and adjusted, with a default of 5 rpm
- Load: 0 – 500g, with each division being 10g
- The distance between the test head and the specimen can be arbitrarily adjusted by adjusting the bolt
- Use the spirit level to adjust the balance rod to be horizontal
- Power Supply: AC 220V 50HZ
- External Dimensions: 660mm * 311mm * 365mm (Width * Depth * Height)
- Weight: Approximately 18kg
- Measuring Range: 540g, Accuracy: ±2

SHANDONG DRICK INSTRUMENTS CO.,LTD
Company Profile
Shandong Drick Instruments Co., Ltd, is mainly engaged in the research and development, manufacturing and sales of testing instruments.
The company established in 2004.
Products are used in scientific research units, quality inspection institutions, universities, packaging, paper, printing, rubber and plastics, chemicals, food, pharmaceuticals, textiles, and other industries.
Drick pays attention to talent cultivation and team building, adhering to the development concept of professionalism, dedication.pragmatism, and innovation.
Adhering to the customer-oriented principle, solve the most urgent and practical needs of customers, and provide first-class solutions to customers with high-quality products and advanced technology.


