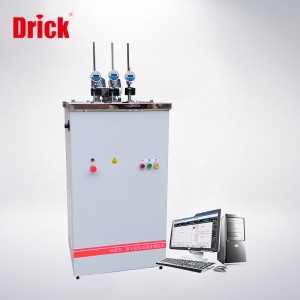
HDT VICAT Tester DRKRW-300CL-3
Short Description:
DRKRW-300CL-3 HDT VICAT Tester Overview: Mainly used for measuring the thermal deformation temperature and Vicat softening point temperature of non-metallic materials such as plastics, hard rubber, nylon, electrical insulation materials, long fiber reinforced composite materials, high-strength thermosetting laminated materials, etc. Easy to operate and precisely controlled, it is a highly intelligent testing instrument widely used in colleges, research institutions, and product quality...
DRKRW-300CL-3 HDT VICAT Tester

Overview:
Mainly used for measuring the thermal deformation temperature and Vicat softening point temperature of non-metallic materials such as plastics, hard rubber, nylon, electrical insulation materials, long fiber reinforced composite materials, high-strength thermosetting laminated materials, etc. Easy to operate and precisely controlled, it is a highly intelligent testing instrument widely used in colleges, research institutions, and product quality supervision and inspection units.
Testing standards:
Meet the requirements of GB/T 1633, GB/T 8802, GB/T 1634, ISO 2507, ISO 75, ISO 306, ASTMD 1525, ASTMD 648 and other standards.
Instrument features:
Test bench lifting system
The automatic lifting function of the test stand greatly facilitates the operation of the test, improves the efficiency of the test, and avoids personal injury.
Advanced control systems
It has ultra-high stability and is easier to install, test, and analyze.
Humanized software control system
Simulate digital tubes to display temperature and displacement, and draw test curves, providing multiple coordinate curves for centralized data management. It can analyze test data, print test curves, test data, and test reports.
Quadruple security protection
Multiple software and hardware security designs, including mechanical temperature upper limit protection switch, software temperature upper limit protection, automatic stop after test completion, and administrator operation key, ensure safe and stable operation of the test.
High precision measurement and control system
High performance temperature sensors and advanced capacitive grid digital micrometers are used to accurately measure small changes in the sample. Advanced PID algorithm and full photoelectric isolation phase modulation module are used for temperature control, ensuring that the temperature rise rate error is less than 0.5 ℃.
Technical parameter
Temperature control range: room temperature~300 ℃;
Maximum temperature error: ± 0.5 ℃;
Heating rate: set arbitrarily between 50 ℃/h, 120 ℃/h, or 50-120 ℃/h;
Temperature measurement point: 1;
Number of test stands: 3;
Deformation measurement tool: high-precision digital display micrometer;
Deformation measurement range: 0-10mm;
Maximum deformation error: ± 0.005mm;
Deformation resolution: 0.001mm;
Sample support span: 64mm, 100mm;
Equipped with software upper limit temperature protection function and hardware upper limit temperature protection function (the temperature switch is imported from South Korea, with a current of 30A, not pseudo protection, and a heating power of 4000W, which can ensure a temperature rise of 120 ℃/h to 300 degrees);
The sample holder is automatically lifted and lowered, and the thermal expansion coefficient of the sample holder itself is less than 0.005/100 ℃ (key point, directly affecting the experimental results);
The control method adopts a distributed control system consisting of a microcontroller and a PC;
Equipped with an automatic lifting system for the sample holder;
Medium used: methylsilicone oil or transformer oil;
Cooling method: Natural cooling above 150 ℃, water cooling below 150 ℃ or natural cooling.
External dimensions: 600 * 600 * 1200mm, weight 100kg
Configuration list:
|
Item |
Quantity |
|
Main engine |
1 set |
|
Sample holder |
3 pcs |
|
Hot deformation head |
3 pcs |
|
Vicat pressure needle |
3 pcs |
|
Computer |
1 set |
|
Printer |
1set |
|
Software |
1 set |
|
Power cord |
1 root |
|
Signal communication line |
1 set |
|
Weights |
1 set |
|
Digital dial indicator with a range of 0-10mm |
3 pcs |

SHANDONG DRICK INSTRUMENTS CO.,LTD
Company Profile
Shandong Drick Instruments Co., Ltd, is mainly engaged in the research and development, manufacturing and sales of testing instruments.
The company established in 2004.
Products are used in scientific research units, quality inspection institutions, universities, packaging, paper, printing, rubber and plastics, chemicals, food, pharmaceuticals, textiles, and other industries.
Drick pays attention to talent cultivation and team building, adhering to the development concept of professionalism, dedication.pragmatism, and innovation.
Adhering to the customer-oriented principle, solve the most urgent and practical needs of customers, and provide first-class solutions to customers with high-quality products and advanced technology.


