DRK139 Total Inward Leakage Operation Manual
Short Description:
Preamble Thank you for choosing our products. Our company will not only provide your company with high-quality products, but also provide reliable and first-class after-sales service. In order to ensure the personal safety of the operator and the integrity of the instrument, please read this operation manual carefully before using the instrument and pay attention to the relevant precautions. This manual describes in detail the design principles, related standards, structure, operating speci...
Preamble
Thank you for choosing our products. Our company will not only provide your company with high-quality products, but also provide reliable and first-class after-sales service.
In order to ensure the personal safety of the operator and the integrity of the instrument, please read this operation manual carefully before using the instrument and pay attention to the relevant precautions. This manual describes in detail the design principles, related standards, structure, operating specifications, maintenance methods, common faults and treatment methods of this instrument. If various “test regulations” and “standards” are mentioned in this manual, they are for reference only. If your company has objections, please review the relevant standards or information yourself.
Before the instrument is packaged and transported, the factory staff has carried out a detailed inspection to ensure the quality is qualified. However, although its packaging can withstand the impact caused by handling and transportation, severe vibration may still damage the instrument. Therefore, after receiving the instrument, please carefully check the instrument body and parts for damage. If there is any damage, please provide your company with a more comprehensive written report to the company’s market service department. The company will deal with the damaged equipment for your company and ensure that the quality of the instrument is qualified.
Please check, install and debug according to the requirements on the manual. The instructions should not be thrown away randomly, and should be kept properly for future reference!
When using this instrument, if the user has any comments or suggestions on the deficiencies and improvements of the instrument design, please inform the company.
Special reputation:
This manual cannot be used as a basis for any request to the company.
The right to interpret this manual rests with our company.
Safety Precautions
1.Safety signs:
The content mentioned in the following signs is mainly to prevent accidents and dangers, protect operators and instruments, and ensure the accuracy of test results. Please pay attention!
INTRODUCTION
The Inward Leakage Tester is used to test the leakage protection performance of respirator and protective clothing against aerosol particles under certain environmental conditions.
The real person wears a mask or respirator and stands in the room (chamber) with a certain concentration of aerosol (in the test chamber). There is a sampling tube near the mouth of the mask to collect the aerosol concentration in the mask. According to the requirements of the test standard, the human body completes a series of actions, reads the concentrations inside and outside the mask respectively, and calculates the leakage rate and overall leakage rate of each action. The European standard test requires the human body to walk at a certain speed on the treadmill to complete a series of actions.
Protective clothing test is similar to the test of mask, requires real people to wear protective clothing and enter the test chamber for a series of tests. The protective clothing also has a sampling tube. The aerosol concentration inside and outside the protective clothing can be sampled, and clean air can be passed into the protective clothing.
Testing Scope:Particulate Protective Masks, Respirators, Disposable Respirators, Half Mask Respirators, Protective Clothing, etc.
Testing Standards:
| GB2626(NIOSH) | EN149 | EN136 | BSEN ISO13982-2 |
SAFETY
This section describes the safety symbols that will appear in this manual. Please read and understand all precautions and warnings before using your machine.
SPECIFICATION
| Test Chamber: | |
| Width | 200 cm |
| Height | 210 cm |
| Depth | 110 cm |
| Weight | 150 kg |
| Main Machine: | |
| Width | 100 cm |
| Height | 120 cm |
| Depth | 60 cm |
| Weight | 120 kg |
| Electric and Air Supply: | |
| Power | 230VAC, 50/60Hz, Single Phase |
| Fuse | 16A 250VAC Air Switch |
| Air Supply | 6-8Bar Dry and Clean Air, Min. Air Flow 450L/min |
| Facility: | |
| Control | 10” Touchscreen |
| Aerosol | Nacl, Oil |
| Environment: | |
| Voltage Fluctuation | ±10% of rated voltage |
BRIEF INTROCUCTION
Machine Introduction
Main Power Air Switch

Cable Connectors
Power Switch for Test Chamber Treadmill Power Socket
Exhaust Blower on Bottom of Test Chamber
Sampling Tubes Connection Adaptors inside Test Chamber
(Connection Methods refers to Table I)
Be sure D and G with plugs on it when operating the tester.
Samples Tubes for Masks (Respirators)
Sampling Tubes
Plugs for connecting the sampling tube connectors
Touchscreen Introduction
Testing Standard Selection:
Click the button below to select GB2626 Nacl, GB2626 Oil, EN149, EN136 and other mask test standards, or EN13982-2 protective clothing test standard.
English/中文:Language Selection
GB2626Salt Testing Interface:
GB2626 Oil Testing Interface:
EN149 (salt) test interface:
EN136 Salt Testing Interface:
Background Concentration:the concentration of particulate matter inside the mask measured by a real person wearing a mask (respirator) and standing outside the test chamber without aerosol;
Environmental Concentration:the aerosol concentration in the test chamber during the test;
Concentration In the Mask:during the test, the aerosol concentration in the mask of the real person after each action;
Air Pressure in the Mask:the air pressure measured in the mask after wearing the mask;
Leakage Rate:the ratio of aerosol concentration inside and outside the mask measured by a real person wearing a mask;
Test Time:Click to start the test timing;
Sampling Time:Sensor Sampling Time;
Start / Stop:start the test and pause the test;
Reset:Reset the test time;
Start Aerosol: after selecting the standard, click to start the aerosol generator, and the machine will enter the preheating state. When the environmental concentration reaches the concentration
required by the corresponding standard, the circle behind the environmental concentration will turn green, indicating that the concentration has been stable and can be tested.
Background Measurement: background level measurement;
NO 1-10: the 1st-10th human tester;
Leakage rate 1-5: leakage rate corresponding to 5 actions;
Overall leakage rate: the overall leakage rate corresponding to five action leakage rates;
Previous / next / left / right: used to move the cursor in the table and select a box or the value in the box;
Redo: select a box or the value in the box and click redo to clear the value in the box and redo the action;
Empty: clear all data in the table (Be sure you have written down all the data).
Back: return to the previous page;
EN13982-2 Protective Clothing (salt) Test interface:
A in B out,B in C out,C in A out:Sampling methods for different air inlet and outlet modes of protective clothing;
INSTALLATION
Uncrating
When receiving your tester, please check the box for possible damage during transportation. Carefully unpack the instrument and thoroughly inspect the components for any damage or deficiency. Report any equipment damage and / or shortage to find customer service.
List of Material
1.1.1 Standard Package
Packing List:
- Main Machine: 1 unit;
- Test Chamber: 1 unit;
- Treadmill: 1 unit;
- Nacl 500g/bottle: 1 bottle
- Oil 500ml/bottle: 1 bottle
- Air Tube(Φ8): 1 pcs
- Capsule Particule Filter:5 units(3units installed)
- Air Filter:2 pcs (installed)
- Sampling Tube Connectors: 3pcs (with soft tubes)
- Aerosol Contatiner Tools: 1pcs
- Firmware Upgrade Kit: 1 set
- 3M Adhesive Tape:1 Roll
- Power Cable:2 pcs (1 with adaptor)
- Instruction Manual:1 pcs
- Spare Aerosol Container
- Spare Aerosol Contatiner Tools
- Spare Air Filter
- Spare Particle Filter
- Nacl 500g/bottle
- Oil
1.1.2 Optional Accessories
Installation Requirement
Before installing the instrument, make sure that the installation site meets the following requirements:
A solid and flat ground can bear 300 kg or more to support the instrument;
Provide enough power for the instrument according to the need;
Dry and clean compressed air, with 6-8bar pressure, Min. flow rate 450L/min.
Outlet pipeline connection: 8mm outside diameter pipepipe.
Location
Unpack the Tester, assemble the test chamber (reinstall the blower on the top of the test chamber after it has been located), and place it in a room with stable temperature and humidity on a firm ground.
The main machin is placed in front of the test chamber.
The area of the laboratory room shall not be less than 4m x 4m, and the external exhaust system shall be installed;
Intake pipe connection:
Insert the φ 8mm air pipe of the air source into the air pipe connector at the rear of the machine, and ensure the reliable connection.
Leave enough space for installtion and operation
Reinstall the blower on the top of the test chamber after it has been located.
OPERATION
Power On
Please connect the machine to a power supply and a suitable compressed air source before starting the machine.
Preparation
Replacement steps of aerosol solution:
1. Use the disassembly tool of aerosol container to loosen the aerosol container;
2. Remove the aerosol container with both hands;
3. If it is sodium chloride solution, it should be replaced as a whole and cannot be superimposed;
4. If it is corn oil or paraffin oil solution, it can be properly filled to the liquid level line;
5. The dosage of sodium chloride solution: 400 ± 20ml, when it is less than 200ml, a new solution should be replaced;
Preparation of sodium chloride solution: 8g sodium chloride particles are added into 392g purified water and shaken up;
6. The filling amount of corn oil or paraffin oil solution: 160 ± 20ml, which needs to be filled when it is less than 100ml;
7. Corn oil or paraffin oil solution is recommended to be completely replaced at least once a week;
1.1.4 Warmup
Turn on the machine, enter the touch screen interface, select the test standard, and click “start aerosol”. Let the machine warm up first. When the required aerosol concentration is reached, the circle behind “environmental concentration” will turn green。
1.1.5 Purge
After each startup and before shutdown every day, the evacuation action should be carried out. The emptying action can be stopped manually.
1.1.6 Wear Masks
1.1.7 Wear Protective Clothing

Test
1.1.8 Testing Standard Selection
Click the test standard button in the touch screen to select different test standards, among which EN13982-2 is the test standard for protective clothing, and the rest are the test standards for masks;
1.1.9 Background Level Test
Click the “Background Test” button on the touch screen to run the Background Level test.
Test Result
After the test, the test results will be displayed in the table below.
Pipeline Connection
(Table I)
Test (GB2626/NOISH Salt)
Taking GB2626 salt test as an example, the test process and operation of the instrument are described in detail. One operator and several human volunteers are required for the test (need to enter the test chamber for testing)。
First, make sure that the power supply of the main machine is connected to the air switch on the wall(230V/50HZ, 16A);
Main machine air switch 230V/50HZ, 16A
Connect all cables according to the line marks;
Plug in and lock the power switch connecting the main machine and the test chamber;
Connect one end of the hose to the “Aerosol Outlet” on the main machine and the other end to the “Aerosol Inlet” at the top of the test chamber;
Connect compressed air;
Prepare the salt aerosol (the filling amount of Nacl solution: 400 ± 20ml, when it is less than 200ml, it is necessary to replace the new solution);
In the test chamber, find the “test chamber air switch” and turn it on;
Plug in the power plug of the treadmill;
According to table 1, connect a capsule filter to the pipe joint B in the test chamber;
Turn on the power supply air switch of the main machine;
Touchscreen displays;
Select GB2626Nacl;
Click “Start Aerosol” to activate the function (note that the door of test chamber is closed);
Wait for the aerosol in the test chamber to reach stability, and the circle on the right side of
the environmental concentration will turn green, indicating that it can enter the test state;
When waiting for the aerosol concentration to reach a stable level, the Background Level test can be conducted first;
The human body stands outside the test chamber, puts on the mask, and inserts the sampling tube of the mask into the H interface;
Click “Background Measure” to start measuring the Background Level test;
The sampling tube in the mask must be fixed on both sides of the mask;
After the Background Level test, pull out the sampling tube from the H interface, and the human body enters the test chamber to wait for the test;
Insert one of the sampling tubes into port a and the other into port D. A capsule filte is inserted into Interface B;
Click “Start” test, and the cursor is at the position of Leakage rate 1 of volunteer 1;
According to the requirements of GB2626 test standard 6.4.4, complete five actions step by step. Each time a test is completed, the cursor jumps one position to the right until all five actions are completed, and the calculation result of overall leakage rate does not appear;
The second volunteer was then tested and repeated steps 16-22 until 10 volunteers completed the test;
If a person’s action is not standard, the test result can be abandoned. Through the “up”, “next”, “left” or “right” direction buttons, move the cursor to the position to be redone, and click “redo” button to retest the action and automatically record the data;
After all tests are finished, the next batch of tests can be carried out. Before starting the next batch of tests, click the “ Empty ” button to clear the data of the above 10 groups of tests;
Note: Please record the test results before clicking the “Empty” button;
If the test is not continued, click the “Start Aerosol” button again to turn off the aerosol. Then click the “Purge” button to exhaust the aerosol in the test chamber and pipeline;
The Nacl solution needs to be replaced once a day, even if it is not used up, it needs to be replaced completely;
After purging, turn off the main machine power switch and the air switch on the wall to ensure safety;
Test(GB2626 Oil)
Oil aerosol test, similar to salt, start-up operation steps are similar;
Select GB2626 Oil Test;
Add about 200ml paraffin oil into the oil aerosol container (according to the liquid level line, add to the Max. );
Click “Atart Aerosol” to activate the function (note that the door of test chamber is closed);
When the aerosol in the test chamber is stable, the circle on the right side of the environmental concentration will turn green, indicating that the test state can be entered;
When waiting for the aerosol concentration to reach a stable level, the Background Level test can be conducted first;
The human body should stand outside the test chamber, wear the mask, and insert the sampling tube of the mask into the I interface;
Click “Background Measurement” to start measuring the Background Level in the mask;
After the Background Level test, pull out the sampling tube from the I interface, and the human body enters the test chamber to wait for the test;
Insert one of the sampling tubes into the E interface and the other into the G interface. A capsule filter is inserted into the F interface;
According to the requirements of GB2626 test standard 6.4.4, complete five actions step by step. Each time a test is completed, the cursor jumps one position to the right until all five actions are completed, and the calculation result of overall leakage rate does not appear;
The second volunteer was then tested and repeated steps 16-22 until 10 volunteers completed the test;
Other steps are similar to the salt test and will not be repeated here;
If the test is not continued, click the “start aerosol” button again to turn off the aerosol. Then click the “empty” button to empty the aerosol in the test chamber and pipeline;
Replace the paraffin oil every 2-3 days;
After purginging, turn off the power switch of the main machine and the air switch on the wall to ensure safety;
Test(EN149 Salt)
EN149 test procedure is completely the same as GB2626 salt test, and will not be repeated here;
After purginging, turn off the power switch of the main machine and the air switch on the wall to ensure safety;
Test(EN136 Salt)
EN149 test procedure is completely the same as GB2626 salt test, and will not be repeated here;
After purginging, turn off the power switch of the main machine and the air switch on the wall to ensure safety;
Test(EN13982-2 Protective Clothing)
BS EN ISO 13982-2 is the test standard of protective clothing, only salt test is done;
Start up, aerosol generation and test process are basically the same as GB2626 salt test;
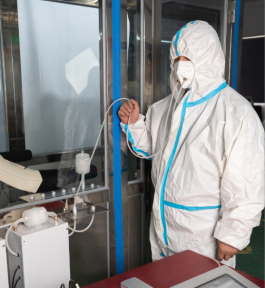
There are three sampling tubes for protective clothing, which need to be connected from the cuff, and the sampling nozzles should be fixed at different parts of the body;
The protective clothing sampling tubes A, B and C are respectively connected to the sampling ports A, B and C in the test chamber. The specific connection method is as follows:
Other test procedures are the same as gb2626 salt property, and will not be repeated her;
After purginging, turn off the power switch of the main machine and the air switch on the wall to ensure safety;
MAINTENANCE
Cleaning
Remove the dust on the surface of the instrument regularly;
Clean the inner wall of the test chamber regularly;
Water Drain from Air Filters
When you find the water in the cup under the air filter, you can drain the water by pushing the black pipe joint from the bottom to the top.
When draining water, disconnect the main switch of power supply and the main switch on the wall.
Air Outlet Filter Replacement
Air Inlet Filter Replacement
Particle Filter Replacement

SHANDONG DRICK INSTRUMENTS CO.,LTD
Company Profile
Shandong Drick Instruments Co., Ltd, is mainly engaged in the research and development, manufacturing and sales of testing instruments.
The company established in 2004.
Products are used in scientific research units, quality inspection institutions, universities, packaging, paper, printing, rubber and plastics, chemicals, food, pharmaceuticals, textiles, and other industries.
Drick pays attention to talent cultivation and team building, adhering to the development concept of professionalism, dedication.pragmatism, and innovation.
Adhering to the customer-oriented principle, solve the most urgent and practical needs of customers, and provide first-class solutions to customers with high-quality products and advanced technology.


